
What¡¯s the best big lift you can do for your upper body? If your gut reaction says the?bench press or military press, you need to start focusing a bit more on pulling over pushing. Truth is, the classic barbell row will give any upper-body exercise a run for its money in terms of developing pure strength and piles of muscle. In fact, most reputable trainers would probably tell you upper-body pulling movements should be prioritized over presses in your program. Why? Because, chances are, your shoulders are hunched at least slightly forward due to guys¡¯ press-happy nature in the gym, plus all the posture-destroying texting, typing, and driving people do, which sets the shoulders even further forward.
If rows aren¡¯t currently a focal point of your training, it¡¯s time they get there¡ªand fast. This one basic movement can be done any number of ways for a bigger, broader, more badass back. Here are six of those ways.
1 of 7
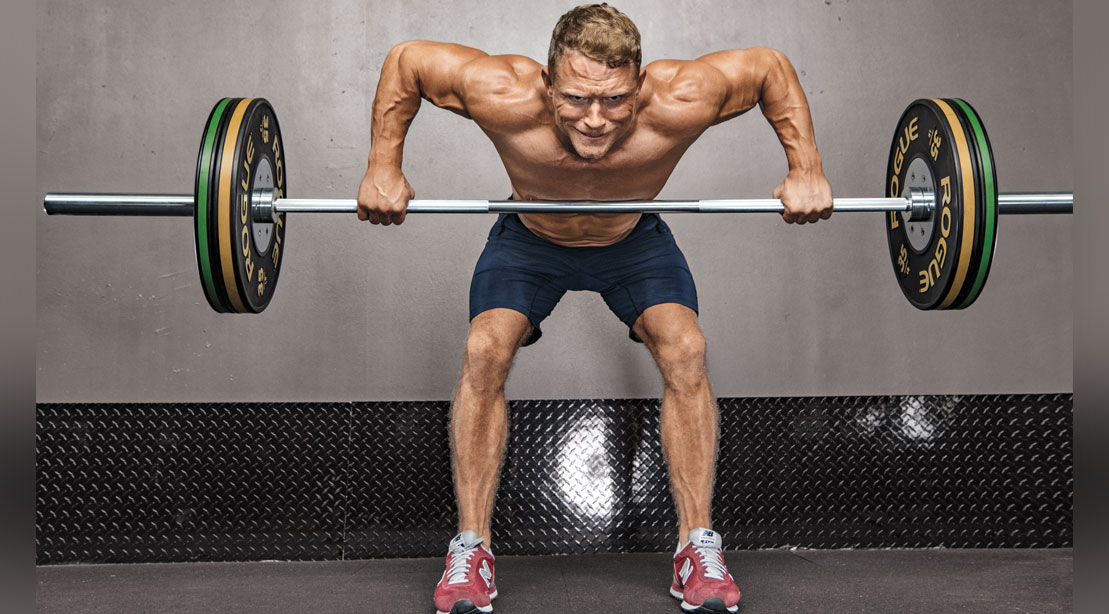
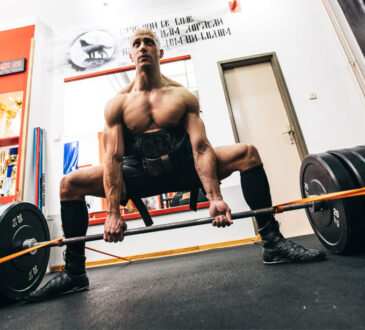
Barbell Row
Defining Difference:?This is your classic back-thickening move¡ªthe reference point for any free-weight row. The weight is heavy, the palms are facing back (pronated), the torso is somewhere between 45 degrees and parallel with the floor (depending on how heavy the weight is), and all you¡¯re thinking about is pulling that bar, with force, up to your stomach while keeping your body stable.
Action:?Stand holding a barbell with a shoulder-width, overhand grip and your knees slightly bent. Bend over at your waist until your torso is between parallel with and 45 degrees to the floor. Start with the bar hanging straight down toward the floor and your arms extended. Bend your elbows and contract your back muscles to pull the bar up to your stomach, keeping your torso in the same position throughout. Squeeze the contraction at the top, then slowly lower the bar back to the arms extended position.
When to Do It: As the first exercise in your back workout, or at the very least your first rowing move after doing heavy lat pulldowns or pullups.
2 of 7

Reverse-Grip Barbell Row
Defining Difference: The reverse-grip (supine) barbell row was the version favored by six-time Mr. Olympia Dorian Yates, owner of one of the most insanely thick backs ever, in his competitive heyday. In fact, when performed with a slightly more upright torso (somewhere around 30 degrees), this exercise is often called the Yates row. Dorian liked the reverse-grip, because he felt it hit the lower lats more effectively than the overhand grip and even provided slightly more range of motion at the top of the rep. Supine rows may call on the biceps a bit, too, but with a strong mind-muscle connection, this is another great back builder.
Action: Start in the same position as a standard barbell row, except with an underhand grip on the bar (still at around shoulder width). Bend over at your waist to the 45-degrees-to-parallel position, start with arms hanging toward the floor, and pull the bar up to your stomach. Again, maintain the same torso angle throughout the lift. Squeeze the contraction at the top, then slowly lower back down. Keep your elbows in tight to your body.
When to Do It: In place of standard (pronated-grip) barbell rows as the first or second exercise (first rowing move) in your back workout.
3 of 7

Dumbbell Row
Defining Difference: The motion here is identical to the barbell row, but naturally, using dumbbells allows for slightly greater range of motion at the top, because there¡¯s no barbell bumping up against your abs. With dumbbells, you also have the option of using a neutral hand position (palms facing in) to hit the back muscles from a slightly different angle, and a reverse grip can be used as well. Variety promotes new muscle growth, so the more the better.
Action: Stand holding a pair of dumbbells with your knees slightly bent. Bend over at your waist until your torso is between parallel with and 45 degrees to the floor, and start with the dumbbells hanging straight down toward the floor, palms facing each other and your arms extended. Maintaining the same torso angle, pull the dumbbells up in unison until they reach waist height. Squeeze your shoulder blades together to achieve full contraction in the back muscles, then lower the weights to the start position.
When to Do It: Because the lower back will be taxed the same as with barbell rows, do the dumbbell version as your first rowing exercise in your back workout.
4 of 7
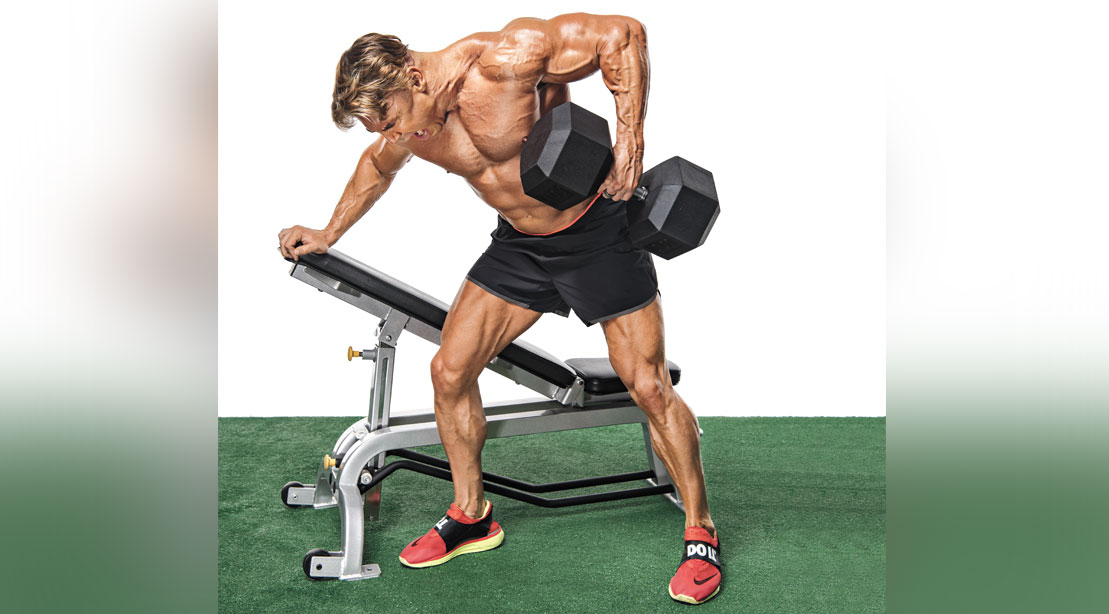
One-Arm Dumbbell Row
Defining Difference: The key here is isolation. Not only will the dumbbell provide maximum range of motion, but pulling with one arm at a time also allows you to focus on bringing up the weaker side if you have an imbalance issue. Plus, because you¡¯re using the bench for support (by having a knee on it), you don¡¯t have to be as mindful of torso position as with standing rows; you can just focus on pulling heavy weight with minimal lower-back injury risk.?
Action: Place one bent knee and same-side hand on a bench with the opposite foot on the floor and that hand holding a dumbbell. Begin bent over at the waist with your back level with the floor, your head pointed down and the dumbbell hanging straight toward the floor with your arm extended, palm facing in. Keeping your chest pointed to the floor, pull the dumbbell up to your waist by contracting your back muscles and bending your elbow. When it reaches the top, squeeze your shoulder blades together, then slowly lower the dumbbell to the start position. Complete all reps with one arm, then switch arms.?
When to Do It: One-arm rows can fall anywhere in your back workout¡ªas the first exercise going heavy, or as a finisher with lighter weight and high reps.
5 of 7
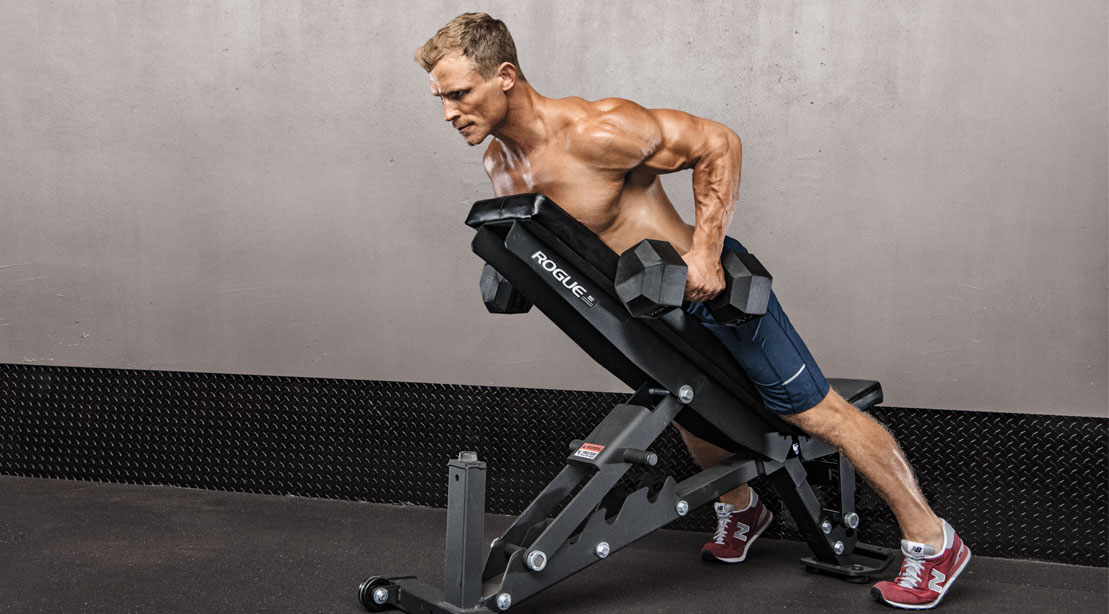
Prone Incline Bench Row
Defining Difference: Lying face down on an incline bench while rowing maximizes isolation, because at this point you don¡¯t have to worry one bit about how your legs are positioned if?your knees are bent. A high flat bench would work well in this capacity, too, but most gyms don¡¯t have such specialty equipment. (Lying facedown on a standard flat bench wouldn¡¯t provide nearly enough clearance to the floor to allow for full extension of the arms.)
Action: Lie facedown on an incline bench with your feet on the floor, holding a pair of dumbbells. Begin with your arms hanging straight toward the floor, palms facing each other and elbows fully extended. Contract your back muscles and lead with your elbows to pull the dumbbells straight up. When they reach your midsection, squeeze your shoulder blades together for a count, then slowly lower the weights to the start position.?
When to Do It: Do this as your last multi-joint back exercise in the workout. If doing a single-joint move like straight-arm pulldowns, this would fall second to last. If you¡¯re not doing any single-joint back work, finish with prone incline rows.
6 of 7

T-Bar Row
Defining Difference: This is basically the plate-loaded machine version of a barbell row (Smith machine barbell row would qualify as this, too). The motion is exactly the same, yet because the weight is on a more fixed path of motion, not as many stabilizing muscles are involved. Some would say this makes the T-bar row less ¡°functional¡± than a barbell row, but it also allows you to overload the large target muscles (lats, rhomboids, middle traps) to a greater extent because of the under-reliance on smaller stabilizers.
Action: Stand on the platform with your feet roughly shoulder-width apart and knees slightly bent. Lean forward and grab the bar with a shoulder-width overhand grip and begin with your arms extended below you and your torso about 45 degrees to the floor.
Pull the weight in toward you by contracting your back muscles and bending your elbows, keeping your chest out and lower back arched. At the top of the rep, squeeze your shoulder blades together, then slowly lower the weight back to the start position.?
When to Do It: T-bar rows work well anywhere in the middle of a back workout to transition from free weight moves to isolation exercises.
7 of 7

Row-Centric Back Workout
- Barbell Row?|?SETS: 4-5?|?REPS: 6-8
- Lat Pulldown?|?SETS:?4?|?REPS:?10
- T-Bar Row?|?SETS:?3?|?REPS:?12
- One-Arm Dumbbell Row?|?SETS: burnout*?|?REPS:?30 per side
*Select a dumbbell weight that you would normally do for a challenging 12¨C15 reps. Go to failure (or at least close to it) on your right side, then repeat on the left. Go back and forth, hitting failure each time (even after you¡¯re failing at far fewer than 12¨C15 reps) and taking minimal rest throughout, until you¡¯ve done at least 30 reps on each side.
Exercise Swaps
- Do reverse-grip barbell rows or dumbbell rows in place of standard overhand barbell rows in any back workout.
- Sub in prone incline dumbbell rows as a finisher in place of one-arm dumbbell rows in any workout. When you do this, perform anywhere from two to four sets of 15¨C20 reps.
- T-bar rows can be replaced with one-arm dumbbell rows when you decide to finish with prone incline rows. When one-arm dumbbell rows show up earlier in the workout, stick to standard straight sets¡ªthree sets of 12¨C15 reps.
- Every other back workout, go down to two rowing movements instead of three. When you do this, add in another pulldown movement or pullups and do the pulldowns or pullups as the first exercise in the back workout.
